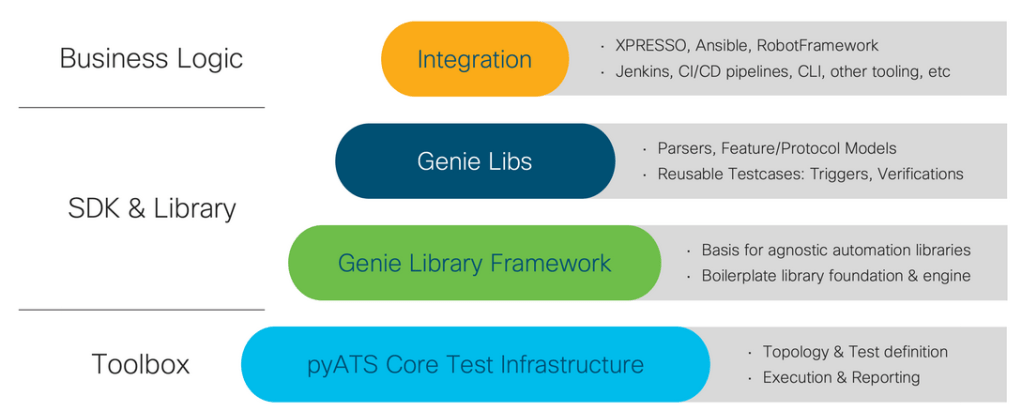
pyATS is a powerful network automation and testing framework designed to help network engineers validate, test, and troubleshoot their infrastructures in a structured and reliable way. Instead of manually checking device configurations and network behavior, pyATS allows you to automate these tasks using Python, making your workflows faster, more consistent, and less error-prone. It is widely used for network state validation, pre- and post-change testing, and large-scale network assurance, especially in modern CI/CD and NetDevOps environments.
We use pyATS to make sure our network devices are configured correctly and consistently. It helps us configure and validate multiple devices in a very short time, instead of checking each one manually. With pyATS, we can easily detect whether configurations have changed and clearly see what exactly was modified. In addition, it allows us to run large-scale tests across the network, which is especially useful for validating changes before and after deployments.
I installed pyATS with pip install pyats[full] at first.
I have 4 routers in my eve lab for test which I enabled the ssh on them. In order to pars out the config we can test the pars on R1 but I need a yaml file as test bed file which contains the devices:
devices:
  R1:
    os: iosxe
    type: router
    platform: x86

    credentials:
      default:
        username: admin
        password: cisco

    connections:
      cli:
        protocol: ssh
        ip: 192.168.199.30

  R2:
    os: iosxe
    type: router
    platform: x86

    credentials:
      default:
        username: admin
        password: cisco

    connections:
      cli:
        protocol: ssh
        ip: 192.168.199.31


  R3:
    os: iosxe
    type: router
    platform: x86

    credentials:
      default:
        username: admin
        password: cisco

    connections:
      cli:
        protocol: ssh
        ip: 192.168.199.32


  R4:
    os: iosxe
    type: router
    platform: x86

    credentials:
      default:
        username: admin
        password: cisco

    connections:
      cli:
        protocol: ssh
        ip: 192.168.199.33
With this command we can pars out the putput of the cli command on the router, you can see that the out put is in dict formatted file:
(venv) saeed@saeed-ubuntu:~/Desktop/pyATS$ pyats parse "show ver" --testbed-file devices.yaml --devices R1
  0%|                                                                                                                           | 0/1 [00:00<?, ?it/s]{
  "version": {
    "chassis": "IOSv",
    "chassis_sn": "9SQUBEOEJBKHYNJAKQD8W",
    "compiled_by": "mcpre",
    "compiled_date": "Mon 08-Aug-22 15:22",
    "copyright_years": "1986-2022",
    "curr_config_register": "0x0",
    "hostname": "R1",
    "image_id": "VIOS-ADVENTERPRISEK9-M",
    "image_type": "production image",
    "label": "RELEASE SOFTWARE (fc1)",
    "last_reload_reason": "Unknown reason",
    "main_mem": "984321",
    "mem_size": {
      "non-volatile configuration": "256"
    },
    "number_of_intfs": {
      "Gigabit Ethernet": "4"
    },
    "os": "IOS",
    "platform": "IOSv",
    "processor_board_flash": "0K",
    "processor_type": "revision 1.0",
    "returned_to_rom_by": "reload",
    "rom": "Bootstrap program is IOSv",
    "rtr_type": "IOSv",
    "system_image": "flash0:/vios-adventerprisek9-m",
    "uptime": "44 minutes",
    "version": "15.9(3)M6",
    "version_short": "15.9"
  }
}
100%|███████████████████████████████████████████████████████████████████████████████████████████████████████████████████| 1/1 [00:00<00:00,  1.13it/s]
If we want to send multiple commands, we can add other commands just after the first command:
pyats parse "show ver" "show ip interface brief" --testbed-file devices.yaml --devices R1
Now I want to test the same scenario with the code:
from genie.testbed import load
tb = load('devices.yaml')
dev = tb.devices['R1']
dev.connect()

p1 = dev.parse("show version")

output:
Enter configuration commands, one per line.  End with CNTL/Z.
R1(config)#no logging console
R1(config)#line console 0
R1(config-line)#exec-timeout 0
R1(config-line)#line vty 0 4
R1(config-line)#exec-timeout 0
R1(config-line)#end
R1#

2026-02-09 11:39:00,081: %UNICON-INFO: +++ R1 with via 'cli': executing command 'show install summary' +++
show install summary
show install summary
       ^
% Invalid input detected at '^' marker.

R1#

2026-02-09 11:39:00,306: %UNICON-ERROR: Could not learn the os version

2026-02-09 11:39:01,182: %UNICON-INFO: +++ R1 with via 'cli': executing command 'show version' +++
show version
Cisco IOS Software, IOSv Software (VIOS-ADVENTERPRISEK9-M), Version 15.9(3)M6, RELEASE SOFTWARE (fc1)
Technical Support: http://www.cisco.com/techsupport
Copyright (c) 1986-2022 by Cisco Systems, Inc.
Compiled Mon 08-Aug-22 15:22 by mcpre


ROM: Bootstrap program is IOSv

R1 uptime is 59 minutes
System returned to ROM by reload
System image file is "flash0:/vios-adventerprisek9-m"
Last reload reason: Unknown reason


This product contains cryptographic features and is subject to United
States and local country laws governing import, export, transfer and
use. Delivery of Cisco cryptographic products does not imply
third-party authority to import, export, distribute or use encryption.
Importers, exporters, distributors and users are responsible for
compliance with U.S. and local country laws. By using this product you
agree to comply with applicable laws and regulations. If you are unable
to comply with U.S. and local laws, return this product immediately.

A summary of U.S. laws governing Cisco cryptographic products may be found at:
http://www.cisco.com/wwl/export/crypto/tool/stqrg.html

If you require further assistance please contact us by sending email to
export@cisco.com.

Cisco IOSv (revision 1.0) with  with 984321K/62464K bytes of memory.
Processor board ID 9SQUBEOEJBKHYNJAKQD8W
4 Gigabit Ethernet interfaces
DRAM configuration is 72 bits wide with parity disabled.
256K bytes of non-volatile configuration memory.
2097152K bytes of ATA System CompactFlash 0 (Read/Write)
0K bytes of ATA CompactFlash 1 (Read/Write)
0K bytes of ATA CompactFlash 2 (Read/Write)
0K bytes of ATA CompactFlash 3 (Read/Write)


Configuration register is 0x0

R1#
The first command are the default command which pyATS use to keep the line. But as you can see the out put is like exact cisco cli. bit if we use print (p1) then we can have the structured output:
{‘version’: {‘version_short’: ‘15.9’, ‘platform’: ‘IOSv’, ‘version’: ‘15.9(3)M6’, ‘image_id’: ‘VIOS-ADVENTERPRISEK9-M’, ‘label’: ‘RELEASE SOFTWARE (fc1)’, ‘os’: ‘IOS’, ‘image_type’: ‘production image’, ‘copyright_years’: ‘1986-2022’, ‘compiled_date’: ‘Mon 08-Aug-22 15:22’, ‘compiled_by’: ‘mcpre’, ‘rom’: ‘Bootstrap program is IOSv’, ‘hostname’: ‘R1’, ‘uptime’: ‘1 hour, 3 minutes’, ‘returned_to_rom_by’: ‘reload’, ‘system_image’: ‘flash0:/vios-adventerprisek9-m’, ‘last_reload_reason’: ‘Unknown reason’, ‘chassis’: ‘IOSv’, ‘main_mem’: ‘984321’, ‘processor_type’: ‘revision 1.0’, ‘rtr_type’: ‘IOSv’, ‘chassis_sn’: ‘9SQUBEOEJBKHYNJAKQD8W’, ‘number_of_intfs’: {‘Gigabit Ethernet’: ‘4’}, ‘mem_size’: {‘non-volatile configuration’: ‘256’}, ‘processor_board_flash’: ‘0K’, ‘curr_config_register’: ‘0x0’}}
We can use lean feature of pyATS, so with this feature we can execute all commands related to the object we want. As an example you can see this feature about ospf:
from genie.testbed import load
tb = load('devices.yaml')
dev = tb.devices['R1']
dev.connect(mit=True)
p1 = dev.learn('ospf')


output:
show ip ospf
 Routing Process "ospf 1" with ID 1.1.1.1
 Start time: 00:00:36.419, Time elapsed: 02:19:55.512
 Supports only single TOS(TOS0) routes
 Supports opaque LSA
 Supports Link-local Signaling (LLS)
..
show ip protocols
*** IP Routing is NSF aware ***

Routing Protocol is "application"
  Sending updates every 0 seconds
  Invalid after 0 seconds, hold down 0, flushed after 0
  Outgoing update filter list for all interfaces is not set
..

show running-config | section router ospf 1
router ospf 1
 router-id 1.1.1.1
 network 0.0.0.0 255.255.255.255 area 0
...
show ip ospf neighbor detail
R1#

2026-02-09 13:00:37,612: %UNICON-INFO: +++ R1 with via 'cli': executing command 'show ip ospf sham-links' +++
show ip ospf sham-links
R1#
It is possible to use interactive command, in this example it will creat the logs, console and ops file:
(venv) saeed@saeed-ubuntu:~/Desktop/pyATS$ pyats learn "ospf" --testbed-file devices.yaml --output output

Learning '['ospf']' on devices '['R1']'
100%|███████████████████████████████████████████████████████████████████████████████████████████████████████████████████| 1/1 [00:15<00:00, 15.78s/it]
+==============================================================================+
| Genie Learn Summary for device R1                                            |
+==============================================================================+
|  Connected to R1                                                             |
|  -   Log: output/connection_R1.txt                                           |
|------------------------------------------------------------------------------|
|  Learnt feature 'ospf'                                                       |
|  -  Ops structure:  output/ospf_iosxe_R1_ops.txt                             |
|  -  Device Console: output/ospf_iosxe_R1_console.txt                         |
|==============================================================================|


(venv) saeed@saeed-ubuntu:~/Desktop/pyATS$
For learning all features:
(venv) saeed@saeed-ubuntu:~/Desktop/pyATS$ pyats learn "all" --testbed-file devices.yaml --output output
We can sent the config in 2 way to the device, as an example for creating a loopback on the device:
#The first method:

from genie.testbed import load

config_commands = '''
        interface lo0
        ip add 11.11.11.11 255.255.255.255
        '''

tb = load('devices.yaml')
dev = tb.devices['R1']

dev.connect()
dev.configure(config_commands)


#The second method:

from genie.testbed import load
from genie.conf.base import Interface

tb = load('devices.yaml')
dev = tb.devices['R1']

dev.connect(mit=True)

interface = Interface(device=dev, name= "g0/1")
interface.ipv4 = "192.168.10.1/24"
interface.shutdown = False

print(interface.build_config(apply=True))
For comparing different network status we can learn the status of the network in 2 different times and then compare them. In this example we learn the status of the interfaces and save it in output1 and then after changing the ip address of one interface and also adding a new loopback we will compare the two files with genie diff output1 output2 command.
(venv) saeed@saeed-ubuntu:~/Desktop/pyATS$ pyats learn "interface" --testbed-file devices.yaml --output output1


Learning '['interface']' on devices '['R1']'
100%|███████████████████████████████████████████████████████████████████████████████████████████████████████████████████| 1/1 [00:03<00:00,  3.01s/it]
+==============================================================================+
| Genie Learn Summary for device R1                                            |
+==============================================================================+
|  Connected to R1                                                             |
|  -   Log: output1/connection_R1.txt                                          |
|------------------------------------------------------------------------------|
|  Learnt feature 'interface'                                                  |
|  -  Ops structure:  output1/interface_iosxe_R1_ops.txt                       |
|  -  Device Console: output1/interface_iosxe_R1_console.txt                   |
|==============================================================================|


(venv) saeed@saeed-ubuntu:~/Desktop/pyATS$ pyats learn "interface" --testbed-file devices.yaml --output output2

Learning '['interface']' on devices '['R1']'
100%|███████████████████████████████████████████████████████████████████████████████████████████████████████████████████| 1/1 [00:03<00:00,  3.01s/it]
+==============================================================================+
| Genie Learn Summary for device R1                                            |
+==============================================================================+
|  Connected to R1                                                             |
|  -   Log: output2/connection_R1.txt                                          |
|------------------------------------------------------------------------------|
|  Learnt feature 'interface'                                                  |
|  -  Ops structure:  output2/interface_iosxe_R1_ops.txt                       |
|  -  Device Console: output2/interface_iosxe_R1_console.txt                   |
|==============================================================================|


(venv) saeed@saeed-ubuntu:~/Desktop/pyATS$ genie diff output1 output2
1it [00:00, 249.88it/s]
+==============================================================================+
| Genie Diff Summary between directories output1/ and output2/                 |
+==============================================================================+
|  File: interface_iosxe_R1_ops.txt                                            |
|   - Diff can be found at ./diff_interface_iosxe_R1_ops.txt                   |
|------------------------------------------------------------------------------|


#diff_interface_iosxe_R1_ops file:
--- output1/interface_iosxe_R1_ops.txt
+++ output2/interface_iosxe_R1_ops.txt
 info:
  GigabitEthernet0/2:
+  ipv4:
+   172.20.1.1/24:
+    ip: 172.20.1.1
+    prefix_length: 24
+    secondary: False
+ Loopback200:
+  bandwidth: 8000000
+  counters:
+   in_broadcast_pkts: 0
+   in_crc_errors: 0
+   in_errors: 0
+   in_multicast_pkts: 0
+   in_octets: 0
+   in_pkts: 0
+   last_clear: never
+   out_errors: 0
+   out_octets: 0
+   out_pkts: 0
+   rate:
+    in_rate: 0
+    in_rate_pkts: 0
+    load_interval: 300
+    out_rate: 0
+    out_rate_pkts: 0
+  delay: 5000
+  enabled: True
+  encapsulation:
+   encapsulation: loopback
+  ipv4:
+   20.20.20.20/24:
+    ip: 20.20.20.20
+    prefix_length: 24
+    secondary: False
+  mtu: 1514
+  oper_status: up
+  port_channel:
+   port_channel_member: False
+  switchport_enable: False
+  type: Loopback


# + means it is add and - means it is removed.
We can use genie APIs to for example get info of config any thing on the devices:
We cna find the APIs here: https://developer.cisco.com/docs/genie-feature-browser/
#getting routing table of R1

from genie.testbed import load

tb = load('devices.yaml')
dev = tb.devices['R1']
dev.connect(mit=True)
route_table = dev.api.get_routes()

print(route_table)

#output:
R1#

2026-02-09 15:00:27,462: %UNICON-INFO: +++ R1 with via 'cli': executing command 'show ip route' +++
show ip route
Codes: L - local, C - connected, S - static, R - RIP, M - mobile, B - BGP
       D - EIGRP, EX - EIGRP external, O - OSPF, IA - OSPF inter area
       N1 - OSPF NSSA external type 1, N2 - OSPF NSSA external type 2
       E1 - OSPF external type 1, E2 - OSPF external type 2
       i - IS-IS, su - IS-IS summary, L1 - IS-IS level-1, L2 - IS-IS level-2
       ia - IS-IS inter area, * - candidate default, U - per-user static route
       o - ODR, P - periodic downloaded static route, H - NHRP, l - LISP
       a - application route
       + - replicated route, % - next hop override, p - overrides from PfR

Gateway of last resort is 192.168.199.254 to network 0.0.0.0

S*    0.0.0.0/0 [1/0] via 192.168.199.254
      11.0.0.0/32 is subnetted, 1 subnets
C        11.11.11.11 is directly connected, Loopback0
      20.0.0.0/8 is variably subnetted, 2 subnets, 2 masks
C        20.20.20.0/24 is directly connected, Loopback200
L        20.20.20.20/32 is directly connected, Loopback200
      192.168.10.0/24 is variably subnetted, 2 subnets, 2 masks
C        192.168.10.0/24 is directly connected, GigabitEthernet0/1
L        192.168.10.1/32 is directly connected, GigabitEthernet0/1
      192.168.199.0/24 is variably subnetted, 2 subnets, 2 masks
C        192.168.199.0/24 is directly connected, GigabitEthernet0/0
L        192.168.199.30/32 is directly connected, GigabitEthernet0/0
R1#
['0.0.0.0/0', '11.11.11.11/32', '20.20.20.0/24', '20.20.20.20/32', '192.168.10.0/24', '192.168.10.1/32', '192.168.199.0/24', '192.168.199.30/32']
(venv) saeed@saeed-ubuntu:~/Desktop/pyATS$
pyats create project is a helper command that creates a ready-to-use project structure for pyATS testing. It is like a ptoject template we can creat a project with this linux cli command:
pyats create project my_project
After that we have 2 files (pyatscli_job.py pyatscli.py) which help us to have our tests.
We can also create the testbed yaml file using interactive command: (It will ask us about the username/password and the ip address of the devices with platform type.. then it will create us testbed file)
pyats create testbed interactive --output=devices.yaml
With this command we can validate our testbed yaml file to see if everything with it is ok:
(venv) saeed@saeed-ubuntu:~/Desktop/pyATS$ pyats validate testbed devices.yaml
Loading testbed file: devices.yaml
--------------------------------------------------------------------------------

Testbed Name:
    devices

Testbed Devices:
.
`-- R1 [iosxe/x86]

YAML Lint Messages
------------------
  16:1      error    trailing spaces  (trailing-spaces)

Warning Messages
----------------
 - Device 'R1' has no interface definitions

Leave a comment